The ParenThots event: Star Kid's Fair @KL Convention Center

This is the first public event I've attended for crafters. I went there to help 2 of my crafter friends who both organizing a craft session, Miyyah & Norlie. They are also the Art & Guild KL & Selangor members. I've also managed to meet up other crafters that I've known. First time face-to-face with Zam from Miezcraftshop, Asma (As) from Simple Rhyme, Nirwana from My Glass Cubicle, Ayin from Prince & Print & Tania.
Here are some shots from the event:


Some shots that I managed to take on the event.


Both photos courtesy of Miyyah@Kertas on FB: The children are so excited even only watching me squeezing the glue!

For Miyyah's session (Quilling), I was the 'glue girl' squeezing the big white PVA glue for the kids to use for their quilling.


Photo courtesy from Miyyah@Kertas on FB: Norlie briefed me on the coupons for participants which I'd helped to distribute before her session. Asma quietly observing at the back =P


Photo courtesy from SekociNorlie on FB: Me & Zam working on the Hot Glue Gun

For Norlie's session (Recycle jeans craft), I've helped on the coupon for the participant & also as the 'glue girl' with the 'glue boy' Zam working the hot glue gun for the kids. All Norlie's helper has this cute recycle jeans flower on them. Most of them got the pins but I got the hairband =D. It was kinda choatic event but eventually everything somewhat turned up well.

More photos of me here:

Checkout more photos of the event here:

Bubble Beret & Coral Beret Beanie

This is an order from my repeat customer Rahmawati & her friend Esterlina (new customer). Rahmawati ordered the black Coral Beret beanie & Esterlina ordered a red Bubble Beret beanie. Here's some photo of their order that I've completed:

Both beanies safely arrived to both of them =) Thank you both for your order!


Art is Enterprising: The Global Entrepreneurship Week 2010 Malaysia Event

iThis is a small event jointly hosted by Passiona Practice and Rumah Seni dan Kraf Gemilang in conjunction of The Global Entrepreneurship 2010 Malaysia on November 14th at Oakleaf Highland Country Club, Bukit Antarabangsa.

Miyyah, As & me attended this event & managed to met up few artist. We've met the honored guest Puan Sharifah Zuriah Aljefri (Chinese Brush Painting Artist) and Kak Abby Zain (Naive Art, the owner of Rumah Seni dan Kraf Gemilang). There are booths for mural painting, facepainting, clay art & also some other artists selling their art work. There was also lucky draws (which I'm lucky to win a stylingstudio gift voucher! hee =D) & a pitching session too.

Here's a few shots that I've took on the event:
  The mural painting before & after.
Most of the top part are done by adults & lower part are by kids. You can actually see the difference =).

Opening session speech by guests of the event.

 Some crafts display at the Rumah Seni, Pitching Session by Sharina from PassionaPractice, Clay art display from one of the booth and also a booth for kittens & puppies adoption.
 
 Checkout more photo of us here:


First Order for MFK Mini Bags

This first mini bags order was from my secondary schoolmate Ija. She ordered the mini bag, shell bag, 2 Oohana strap & 1 Kohana pin. Here's her order:


Thanks Ija for your order! =)

My First Quilling Experience: Quilling Get Together V1.0 by Miyyah

I know it a super late post but I've decide to post it anyway =). I've attend a few crafter's event this year & I'm going to post all of them within this year (I hope =P).

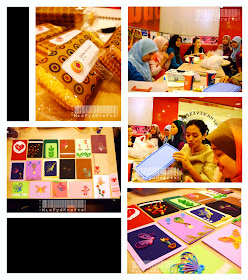
This is late post on the Quilling Get Together at KLCC that I've joined in October. It was my first time learning quilling with a few of the well-known paper crafters in Malaysia. Thanks guys for the tips on paper quilling! I've certainly learned at lot from you guys! So here's some photos from my camera on that day:
We got some free biscuit from Miyyah@kertas, the organizer. We had a great time quilling & learning new tricks together. My side of the the table with Ayin & Nirwana was the most havoc which talks about anything from my lab mouse experience to Ayin's navy. The other side was quite but very diligently making their beautiful quilling cards. My first quilling card is in the cards photo, top left 2nd (Black base with red & yellow swirl).  The other cards are from Miyyah, As, Lin, Saza, Ayin, Nirwana, Tania, Nisa, Molly, Lin

For more photos you can visit some of the link here:


Really glad to meet you all! Hope to join the next session soon~~ =D


Experiment for New F'dyHana Design

I've managed to try a new design for my F'dyHana last month. This time I tried to mix my crochet with filigree. Here's the result:


I think it's more sophisticated & vintage look for F'dyHana as I've used thread for the crochet. What do you think?

Baby Lacey Beanie: New Design Baby Beanie for My Lil Niece

This is an order from my cousin wife Ina for her lovely baby daughter Keisha. She requested a white plain beanie with interchangeable Oohana, so I've design a new baby beanie with two Oohana hairclips. Here's some photo of the new baby beanie:


I made the Oohana as hairclips so that Keisha can wear it with the beanie or by itself.
You can check Keisha wearing the beanie here. =)


Handmade Bamboo Chopstick Crochet Hooks

I've wanted to try to make my own crochet needle for quite sometime. I did some wood & soap carving in secondary school & also some eraser carving recently. So I thought why not carving a bit for my crochet work for a change. 

You can find a few tutorials online on it but I try to improvise whichever is easier for me. I've used plain bamboo chopstick which is cheap & available in any store in Malaysia (bought one big packet for a few ringgits only), blade, sand paper & a bit of bee wax.

Here's some photos of my handmade crochet hooks & some the materials that I've used to make them:


 Here's the simple steps to make the bamboo crochet hooks:
  • Draw with a pencil roughly the shape of the hook compare with your favorite one.
  • Use a sharpener to sharpen the end of the stick & cut the sharp end of the stick. (This is easier way compare to use a blade to carve the rounded hook head)   
  • Carefully carve out the unwanted section with a blade (This might be the hard & tricky part if you are not use to carving, I did throw away some sticks after some fail attempts. Really be careful when you are handling the blade. Start a new stick if you make mistake, you may need to get use to carving it).
  • After you are satisfied with the your carved hook, sand it with a fine waterproof sand paper until all the hook surface are smooth.
  • For the finishing, use some bee wax balsam to make the hook shine & smooth. (you just need a bit for your handmade hook, but you can use this for your other bamboo hooks or needle available to care it)
    Now you are ready to admire your master piece, get hook & enjoy! =)


    Custom Order for Partial Part of a Baby Dress

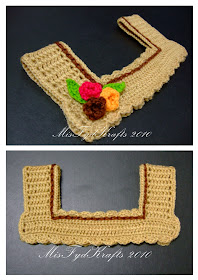
    This is my first custom order for a partial part of a baby dress by Kak Fit, my ex-university mate in Japan. As Kak Fit gave me the specific measurement that she wanted, I've decided to just design it with simple stitches so that I can get the correct measurement. I've struggled a bit on getting the most nearest measurement. So here's the completed partial part of a baby dress:

     
    I've also crocheted some small flower & leaves applique for Kak Fit to play around on the dress later.
    Eager to see the outcome of the dress soon!


    Experiment on My Crochet Design Sketch Book: CroSketchBook

    After my first handmade sketch book, I've decided on experimenting my crochet on a ready-made A4 sketch book that's available in any stationary shop. The idea is to crochet on a metal ring-bounded sketch book rather than punching holes on paper (one hole puncher) which makes my hands numb (making the first sketch book). Although it is not total handmade, but it safes me more energy for the crochet part =). So here's my one & only sketch book with crochet designed on it:


    I've choose white, grey & black tones for the crochet and a black hard cover ring-bounded sketch book (30x21cm).

    The black gigantic flower (D 13cm) is a pattern I've used from a book that I've bought quite sometime ago while in Japan. Actually I've finished crochet it long time ago but did not know what to do with it yet. I thought this is just the appropriate time to use it =)

    The leaves & the edging is my own design. This time I used crochet beads technique for the edging with some pearl white beads to make it stand out. The leaves are just a random pattern that I just crochet along the way.

    The satin ribbon label was ordered from KucinPurple. I designed it & asked them to print it for me on the satin ribbon.
     
    What do you think about this one? I haven't found anyone use the crochet edging technique like this before. Please do share if anyone has found a similar method =)

    I think I would used it for my crochet design collection photos rather than a sketch book =P.