Welcome to MFK

Welcome to MisFydKrafts!

+ I'm Fyd! A full time working Malaysian Biotech scientist based in Kuala Lumpur, who loves crochet, crafts & DIYs.
+ Here's where I started sharing my craft journey since 2010. Since then I've been featured in some of the local TV shows and also magazines.
+ I'm a life member of The Arts & Crafts Guild, KL & Selangor and currently a crochet instructor in Spotlight, Malaysia.

If you like to say hello, you can email me at misfydkrafts@gmail.com


Happy crafting, Happy browsing, Be Original, Support Handmade, Support MFK :)

Fyd

The Founder, Designer, Crocheter, Crafter of MisFydKrafts (001975460-K)
www.misfydkrafts.com.my

===================================================================================================================================

New Shell Beanie & Bow Headbands For Kids

Kak Asma' a colleague of mine, ordered a couple of bow headbands & a beanie for her girl Irdina last month. I've designed a new beanie for her which I called the Shell beanie. Here's the new kids beanie & the headbands that she ordered:

Here's the headbands: One thick with 2 buttons & another one thin with a button. 
Both with maroon bows. The thick headband was attached with a larger bow for balance & the thin headband was attached with the normal size bow that I always make. I think even adult will look cute wearing these =)

Here's the new design Shell Beanie attached with a cute Oohana with cute pink button middle. Hope Irdina will like the beanie.
I think the design would be also suitable for adults with more elegant flower or without it =)

New FunkyHana!

I hope everyone enjoyed their Raya break for anyone who started working & Malaysia Day yesterday. Actually I'm still in my hometown in Kuching for the holiday. I'll be back for work on Tuesday =D.

Here's some due updates, another new design in the Ramadhan month. I've designed a new type of F'dyHana called FunkyHana as they just look just plain fun although need more work on the beads. I used chunky yarns & sew some beads to bling them =) :

I've made several colours & named them Mocha, Ryoku (Green), Vanilla, Latte, Ichigo (Strawberry), Sora (Sky) & Koori (Ice). I sew some round & bugle beads on them =)

Here's the finish product with the FunkyHana. I tried to make them into some pins and hairclips using double prong alligator clips & snap clips too =) What do you think about this new design?

New Bubble Beret Style Beanie

This is an order from Rahmawati. She ordered 2 beanies, one beret style beanie, one custom design & also with 2 Oohana pins which she can detached whenever she wants. I've designed this Bubble beret style beanie for her. Here's the beanie order:

 The new design Bubble Beret style beanie. The top left photo, attached with a Maroon Oohana pin.

Here's the brown simple beret style beanie. This one I've pinned it with a pink Oohana.
Hope that Rahmawati with love these beanies =)

Kohana Key Ring & Bow Pin

Here's some of my Kohana Key Rings & Bow Pins that I've made just for fun last month.

 I've attached the Kohana with some small swivel clasps (2.5cm). Most suitable to attach with a bunch of keys =)

Here's some double bow I've made into pins. FIN.... =P

My crocheter friend's Cute & Yummy Special Crocheter Giveaway!

 Credit: Photo taken from Cute & Yummy Blog

Yup this is my first time trying to join a giveaway by my friend Ezyane =)
It is limited to fellow crocheter only (blink blink =O) So any crocheter out there wanna to get some freebies join her giveaway ok. You can go to her blog directly here for the giveaway.
Hope that I'll will be lucky winner! hehehe.

Simple Bow Headband - custom

Here's an order from my friend Ratemie. This is her second order after the simple beanie which are a bow headband & some rose pins. She wanted a soft colour bow shades of pink & purple so I've designed a new pattern bow for her.

Closeup of the bow headband. The band is the thin type, fasten & adjustable using a button.

 
Here's the bow headband with 4 F'dyHana Rose pins =)

F'dyHana OoHana Brooches

It's been more than 2 weeks since my last blog post! Didn't managed to get time to do updates on my craft as I'm busy crafting and my productivity was kinda slow for the Ramadhan month. I hope I can get my crafting pace back after the Raya. So many things to update including new orders & new designs =). Anyway I'll start to post updates that I left since 3 weeks ago =P 

For starters, here's some of the OoHana brooches with vintage plastic button that I've made for the bazaar last month:

 Made a several colours of Oohana. A few with vintage gold button that I've never used before.
I personally love the blue Oohana =)

Bazaar Preparation DIY - MFK Hat Display Stand

My cheap & easy to make DIY Beanie / Hat Display Stands

I wanted to display my sample beanies & hat but didn't have any stand to do so. After googling & everything, not much info on display stand DIY. Some available hat stands I've found was head mannequin or just simple acrylic / metal stand. These are normally kinda hard to get in Malaysia & I bet it's expensive for crafters like me.

Eventually I've decided on DIY my own display stand. I went to the Art Friend Shop in Gardens to get some materials & ideas for the stand. After browsing in the store, eventually I ended up buying some cylindrical & disc shape polystyrene. I've decided to make use these polystyrene to make my beanie & hat display stand. It's cheap & easy to cut the length just by using a cutter knife. Here's what I did for making my beanie/hat display stand:

Here the polystyrene cylinder & disc that I've glued together with No More Nails Adhesive. I've cut the cylinder into two pieces with different length & glue it on the disc. I've tried to glue polystyrene with UHU glue last time when I make a keychain display & it melted the foam as UHU it is from petroleum based. Try not to use any petroleum based glue for polystyrene foams.

LESSON #1 Do not use petroleum based glue (such as UHU) for polystyrene foam. It melts them!

I wanted to colour the plain white polystyrene. So I tried with some gold colour can spray which is Ester & Keton based. As I have some doubt on using alcohol based paint spray for the polystyrene (as petroleum based glue melts them), I tested it first on an unused polystyrene. The can spray paint melts them!! Well at least I tried on an unused polystyrene =)

LESSON #2 Do not use alcohol based can spray paint for polystyrene. It melts them too!   

As the paint test with a can spray has failed, I tried on a different type of paint which was a water based mural paint (black colour) that I bought from a stationary shop near my home. The paint was water proof, non-toxic & light odour. Tested the paint on the unused polystyrene & it worked just fine =)

LESSON #3 Use water based paint (like Artiz Mural Colour) for polystyrene.

 
So I start to paint my polystyrene hat stand with the mural paint using a brush....

LESSON #4 Make sure to put a paper sheet on your floor or do it out door. It can get really messy.

 
One finished & 2 more to go....

Tadaaaa~ Here's my painted polystyrene display stands. Let it dry for more than 2 hours & they are ready to be use!

LESSON #5 Make sure it's dried properly before handle it. If not the paint will be ruined & it will need some touch up.

One hat stand can be use to display 2 beanie/hat and it's very light (but a bit bulky) to carry if you have to prepare for a booth in market/bazaar. 
It's quite cheap to make:
  • Polystyrene only around RM14 (for making 3 stands)
  • Mural colour was RM18 for 1kg (used just a bit but can be use for something else)
  • Brush for paint was around RM6
  • No More Nail adhesive around RM15 per tube (used the left over I have so no need to buy)
Roughly the for making the stands was total around RM24 for 3 that can display 2 beanies/hat in a time each. If you want to make an easy, light & cheap hat stand, then give this one a try =)

p/s: If the display stand is too light, you can put something heavy like nice looking rock (such as the one use in fish tank) to stable it. Plus, you can even glue another polystyrene ball on top of the cylinder to make a nice volume for your beanie. I didn't managed to find some but then without the ball is still look ok =)

The Threadszoo Sweatfest

After 2 weeks was kinda hectic with work, enquiries, orders & preparation, Nas & me managed to join the Threadszoo SweatFest Bazaar last Sunday. The crowd was not that many but then we had a good experience & managed to make some new friends who most of them have blog shop. I managed to meet Brenda from Baby Sasha N Mom which I was introduced by Norlie from SekociNorlie thru FB.
Anyway here are some snap shot of the event:

This is my part of the booth sharing with Nas from Impromptu Express. I've used some cloth bought from Kamdar for the table cloth, my DIY hat display stand, DIY rack, photo frame DIY for display & some flat baskets/trays.

 With Impromptu Express Owner, Nas =)

With Amy who helped us a lot in setting up & mending the booth =)

The Impromptu Express selling very affordable pretty earrings & necklaces.

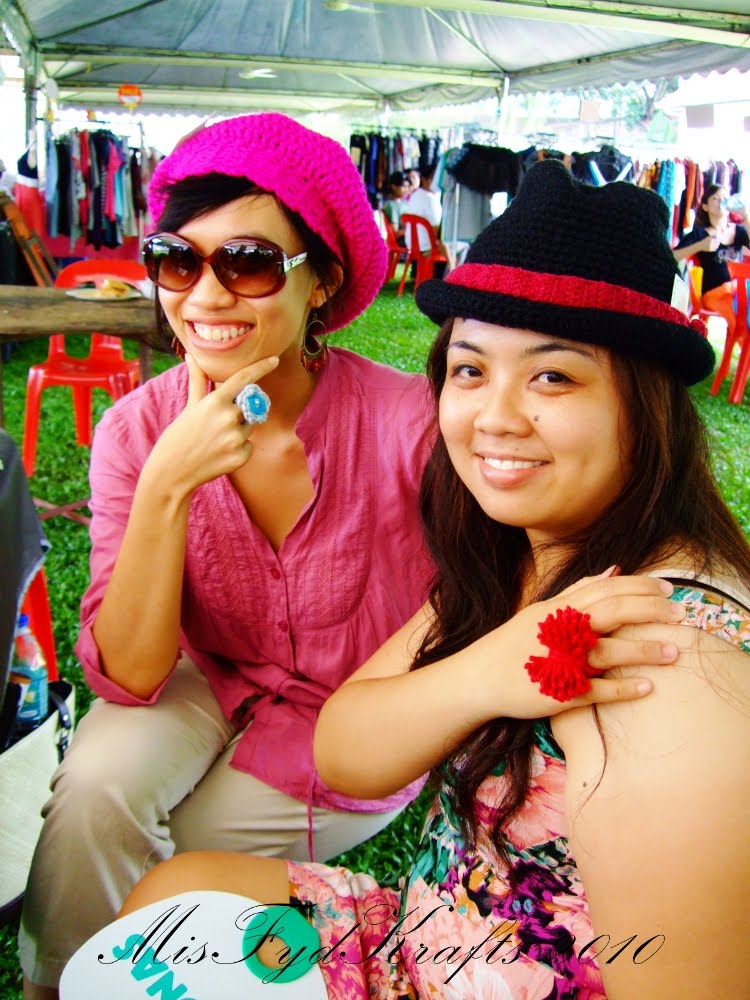
They posed for MFK! Nas looked absolutely gorgeous with my beret style beanie & Amy looked good with my Fydora. 
Both are modeling my new design rings (Hana & Pompom) which were made while mending the booth! Gave the rings to both of them =D

 Haris trying on the MFK Earflap beanie & gave a cute big smile for the camera!
He is certainly will be in my guy model list ;)

 A shot with some of our new friends (one of our booth neighbour) from the bazaar.

Later I'll post my DIYs for the booth including the beanie / hat display stand & simple rack to share everyone =)

Tricolour Oohana Double Button Headband

This is an order from Azra for her baby girl. She wanted a black thick band double button with flower colour shades of pink.  So I've designed a tricolour Oohana. Here's the outcome:

 I've already passed this headband to Azra last month. Hope that it will look great on her baby girl =)

MFK New Hairband Label

Last few weeks, I've designed a new label for MFK's hairband. I've used the same design as my other labels but rearrange so it look different & attractive. The label look like a fat 'I' nearly same concept as my hairtie label (just much more wider). So here's the new hairband/headband label:
 Close up of the hairband label.

When the labels are used for the hairband =)

New Design String Hairband

I made some new design hairband, somewhat modified from the first version string headband.
For me headband or hairband is the same to me =P. So don't be confuse when I interchange the usage. I'm refering to the same thing ;). I've used a different type of yarn (thicker) & a bit different design. Here's the new design hairband:

 Used the vintage plastic flower button for the fastener.
Adjustable string hairband & a bit stretchable.
How the hairband look like while fastened =) These will be also at the bazaar.

Related Posts Plugin for WordPress, Blogger...